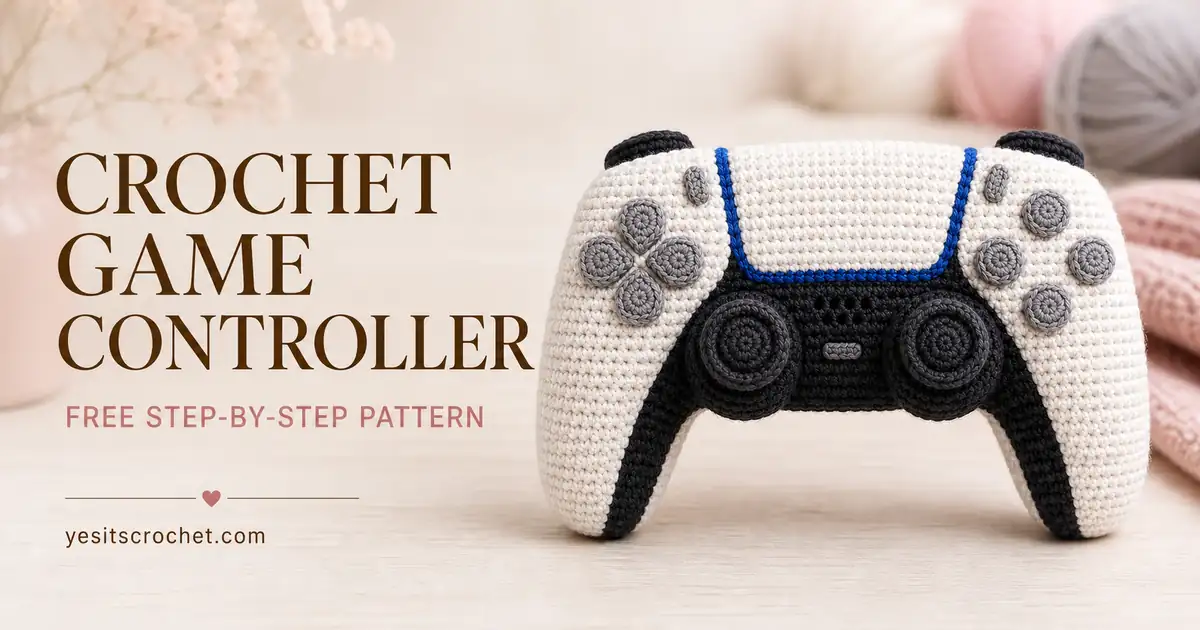
Free pattern · US crochet terms
A Realistic Crochet Game Controller, Piece by Piece
Build the controller in a clear sequence: padded black base, shaped white shells, blue-trimmed upper panel, joysticks, D-pad, buttons, and final assembly.
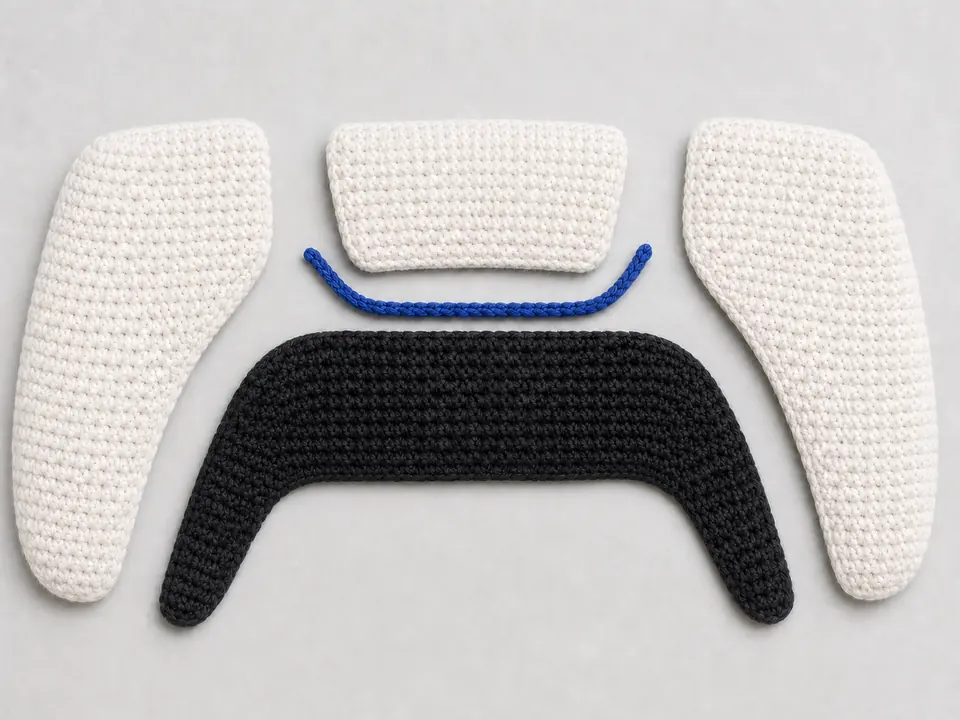
The realistic shape comes from layers rather than one complicated form. Follow the sections in order and complete each group of pieces before moving to the next one.
Materials You’ll Need
Yarn
- 180–220 yd charcoal or black worsted-weight (#4) yarn
- 150–180 yd warm white or cream worsted-weight (#4) yarn
- 35–45 yd medium gray yarn for the D-pad and buttons
- 10–15 yd royal blue yarn for the center-panel trim
- A small amount of true black yarn for speaker holes, if your base is charcoal
Tools and notions
- E/4 (3.5 mm) crochet hook
- Polyester fiberfill
- Yarn needle and sharp scissors
- Stitch markers
- Straight pins or locking markers for assembly
- Optional row counter and flexible tape measure
US Crochet Terms and Abbreviations
| Abbreviation | Meaning | How it is used |
|---|---|---|
| ch | chain | Foundation and turning chains |
| sc | single crochet | Main stitch throughout |
| hdc | half double crochet | Shapes the D-pad petals |
| dc | double crochet | Rounds the D-pad petals |
| sl st | slip stitch | Joining, edging, and finishing |
| inc | increase | Work 2 sc in the same stitch |
| dec | invisible decrease | Single crochet 2 stitches together |
| BLO | back loop only | Creates the joystick-cap edge |
| MR | magic ring | Closes the center of a round |
| st(s) | stitch(es) | Stitch-count reference |
Turning chains do not count as stitches. A number in brackets, such as [13], is the stitch count after completing that row or round.
Gauge, Size, and Construction
Gauge and finished size
Gauge: 17 sc × 18 rows = 4 inches in firm single crochet.
Finished size: approximately 10 inches wide, 7 inches tall, and 1¾ inches deep.
How the layers work
Make two identical black silhouettes and join them into a lightly padded core. Sew two white side shells and one white upper panel over the front. Add the gray, black, and blue details last.
Free Crochet Game Controller Pattern
Black Controller Silhouette — Make 2
Use charcoal or black yarn. Work in turned rows. The first ten rows form the wide top bridge; then the work splits into two tapered handles.
Top bridge
- Foundation: Ch 43.
- Row 1: Starting in the second ch from the hook, sc across. Ch 1, turn. [42]
- Rows 2–10: Sc across. Ch 1, turn. Do not fasten off after Row 10. [42]
First handle
- Rows 1–5: Sc in the first 13 sts only. Ch 1, turn. Leave the remaining 29 sts unworked. [13]
- Row 6: Dec, sc 9, dec. Ch 1, turn. [11]
- Rows 7–10: Sc across. Ch 1, turn. [11]
- Row 11: Dec, sc 7, dec. Ch 1, turn. [9]
- Rows 12–16: Sc across. Ch 1, turn. [9]
- Row 17: Dec, sc 5, dec. Ch 1, turn. [7]
- Rows 18–22: Sc across. [7]
Fasten off.
Second handle
With the right side of Top Bridge Row 10 facing you, skip the center 16 stitches. Join yarn in the first of the final 13 stitches. Repeat Handle Rows 1–22 exactly. Fasten off.
Make a second complete silhouette the same way. Lay the two pieces together and check that the top edges, inner arch, and handle ends match.
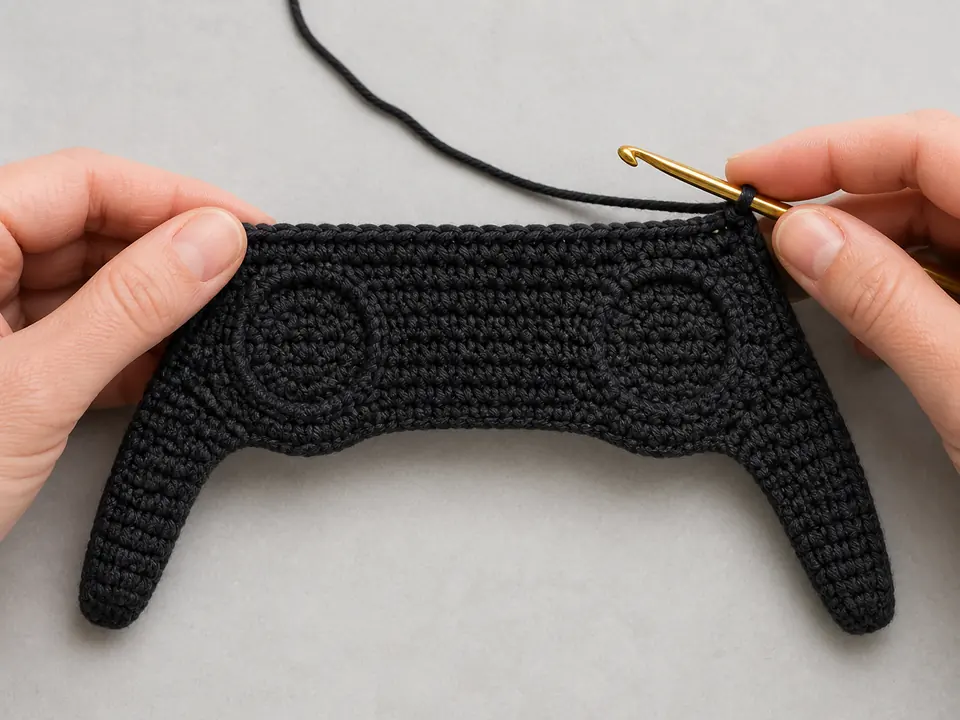
Join and Lightly Stuff the Black Base
Place both silhouettes with wrong sides together. Pin the matching row ends at the top corners, inside the arch, and at both handle tips.
- Join charcoal yarn at the center of the top edge.
- Sc through both layers around the entire outline. Work one sc in each stitch along horizontal edges and approximately one sc in each row end along vertical or slanted edges. Add an occasional extra sc at a corner only if the edge begins to pull.
- Stop with a 3-inch opening along the top. Insert a thin, even layer of fiberfill. The body should feel softly padded, not firm or round.
- Finish the seam, sl st to the first sc, and weave in the tail.
White Side Shells and Blue-Trimmed Panel
White Side Shells — Make 2
Use warm white yarn and work from the narrow handle tip toward the wide shoulder. These pieces are flat overlays; a very thin layer of stuffing is added only while sewing.
- Foundation: Ch 8.
- Row 1: Sc in the second ch from the hook and across. Ch 1, turn. [7]
- Rows 2–5: Sc across. Ch 1, turn. [7]
- Row 6: Inc, sc 5, inc. Ch 1, turn. [9]
- Rows 7–10: Sc across. Ch 1, turn. [9]
- Row 11: Inc, sc 7, inc. Ch 1, turn. [11]
- Rows 12–16: Sc across. Ch 1, turn. [11]
- Row 17: Inc, sc 9, inc. Ch 1, turn. [13]
- Rows 18–20: Sc across. Ch 1, turn. [13]
- Row 21: Inc, sc 11, inc. Ch 1, turn. [15]
- Rows 22–25: Sc across. [15]
Fasten off with a tail at least 36 inches long. Make the second shell exactly the same; the pieces become left and right shells through mirrored placement, not different stitch counts.
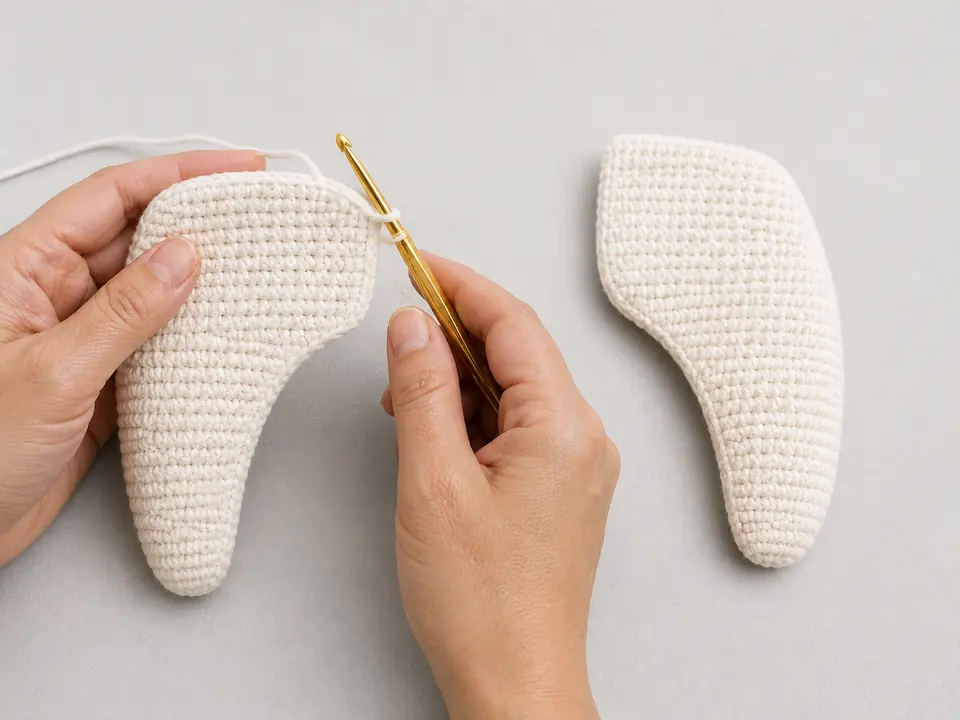
White Upper Center Panel and Blue Edge
Use warm white yarn. The panel is widest across the lower edge and sits between the two side shells.
- Foundation: Ch 17.
- Row 1: Sc in the second ch from the hook and across. Ch 1, turn. [16]
- Row 2: Inc, sc 14, inc. Ch 1, turn. [18]
- Row 3: Inc, sc 16, inc. Ch 1, turn. [20]
- Rows 4–10: Sc across. [20]
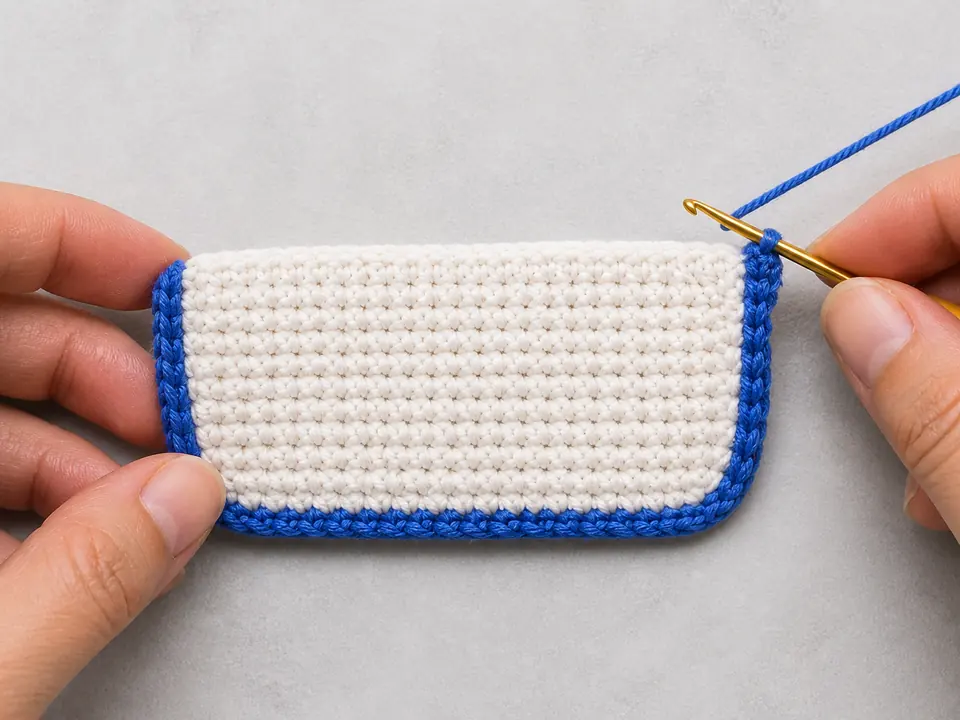
Fasten off white. Join blue yarn at the upper-left corner. Sl st evenly down the left side, across the foundation edge, and up the right side. Leave the upper edge white. Fasten off with a long blue tail.
Crochet the Separate Controls
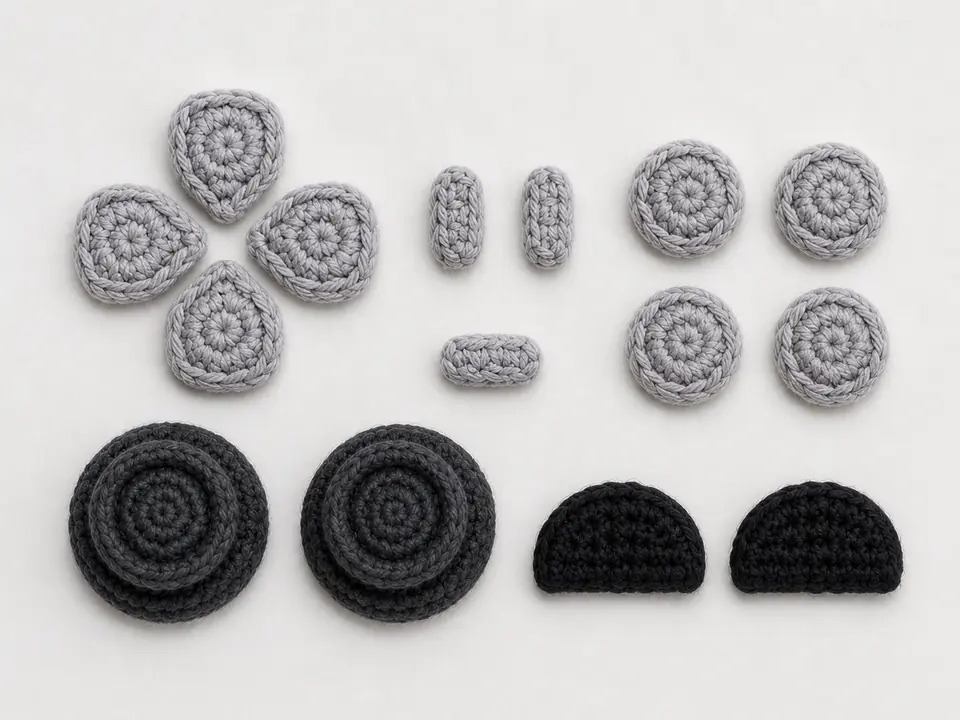
Joysticks — Make 2 Complete Sets
Flat base disc — Make 2
- Round 1: With charcoal, work 6 sc in an MR. [6]
- Round 2: Inc in each st around. [12]
- Round 3: (Sc 1, inc) 6 times. [18]
- Round 4: (Sc 2, inc) 6 times. Sl st and fasten off with a long tail. [24]
Raised cap — Make 2
- Round 1: Work 6 sc in an MR. [6]
- Round 2: Inc in each st around. [12]
- Round 3: (Sc 1, inc) 6 times. [18]
- Round 4: In BLO, sc around. [18]
- Round 5: Sc around. [18]
- Round 6: (Sc 1, dec) 6 times. [12]
- Round 7: Dec 6 times, adding a small pinch of stuffing before closing. [6]
Sew one cap in the center of each base disc.
D-Pad, Face Buttons, Small Ovals, and Shoulder Buttons
D-pad petals — Make 4 in gray
Ch 5. Starting in the second ch from the hook, sc 1, hdc 1, dc 1, and work 5 dc in the final ch. Continue along the unused loops on the opposite side of the chain: dc 1, hdc 1, sc 1. Sl st to the first sc. Fasten off with a long tail. [11 sts]
The starting-chain end forms the narrow point. During assembly, aim all four points toward the center to reproduce the four-petal directional pad.
Round face buttons — Make 4 in gray
- Round 1: Work 6 sc in an MR. [6]
- Round 2: Inc around. [12]
- Round 3: (Sc 1, inc) 6 times. Sl st and fasten off with a long tail. [18]
Upper oval buttons — Make 2 in gray
Ch 5. Starting in the second ch, sc in the next 3 ch, work 3 sc in the final ch, continue along the opposite side with sc in the next 2 loops, then work 2 sc in the final loop. Sl st and fasten off. [10]
Center pill — Make 1 in gray
Ch 4. Starting in the second ch, sc in the next 2 ch, work 3 sc in the final ch, continue along the opposite side with sc in the next loop, then work 2 sc in the final loop. Sl st and fasten off. [8]
Shoulder half-discs — Make 2 in black
- Row 1: Ch 2; work 3 sc in the second ch from the hook. Ch 1, turn. [3]
- Row 2: Inc in each st. Ch 1, turn. [6]
- Row 3: (Sc 1, inc) 3 times. Ch 1, turn. [9]
- Row 4: (Sc 2, inc) 3 times. Fasten off. [12]
Assembly: Match the Reference Shape
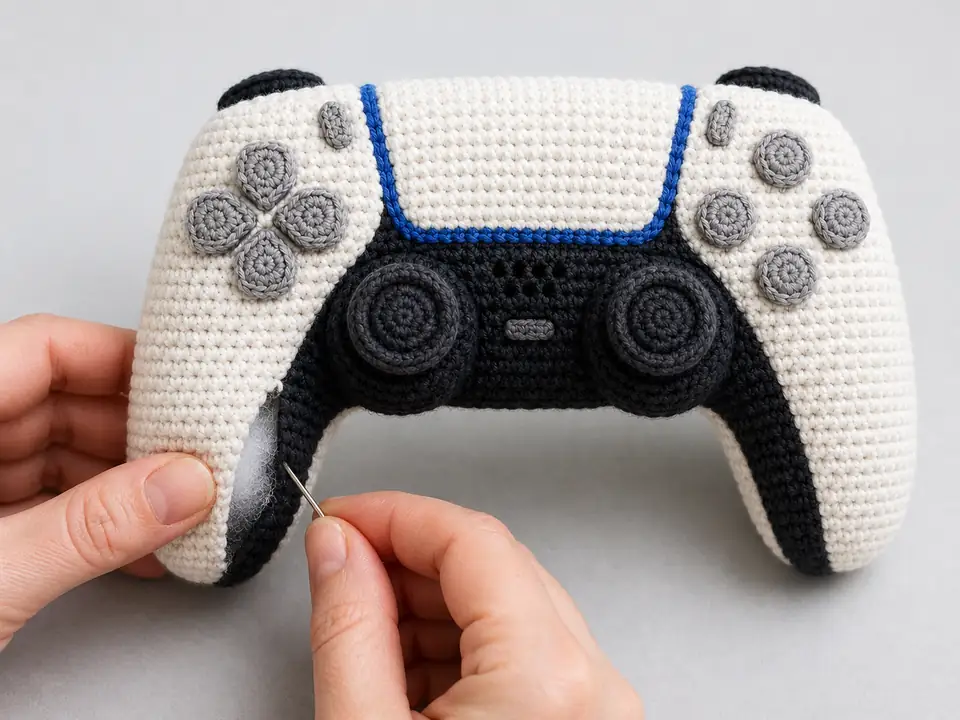
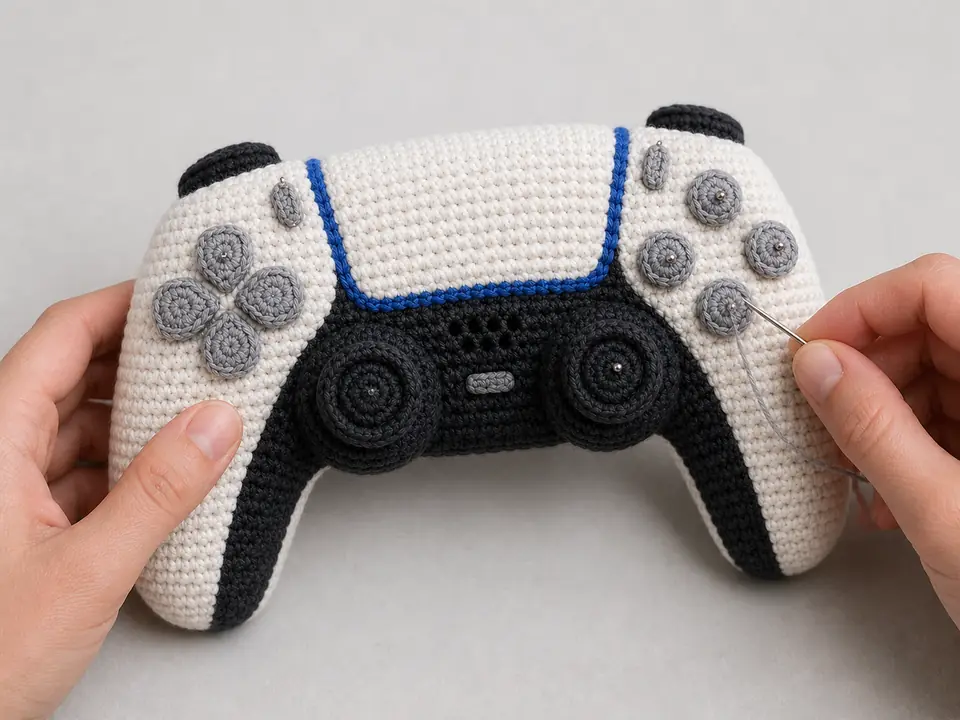
Use the finished photograph as a placement guide. Pin all three white overlays first; then place every control before sewing any small piece permanently.
Attach the Large White Sections
- Position the side shells. Place the narrow end of each white shell at a black handle tip. Angle the widest end toward the corresponding upper corner. Leave a visible strip of black along each inner handle edge.
- Mirror before sewing. Count the exposed black stitches at the left and right inner edges. Adjust until both sides match.
- Sew the outer and top edges first. Use the long white tails and small whipstitches. Add a paper-thin layer of fiberfill under each shell to soften the surface, but do not hide the black core’s contour.
- Close the inner edges. Smooth the fill toward the center of each shell, then stitch the remaining edge securely.
- Add the upper panel. Center the white rectangle at the top, slightly overlapping the inner edges of both side shells. Keep the blue-trimmed lower edge level and sew through the blue slip stitches.
- Add shoulder buttons. Tuck each black half-disc behind a top outside corner so only the curved half is visible. Sew to the black base.
Speaker Holes and Control Placement
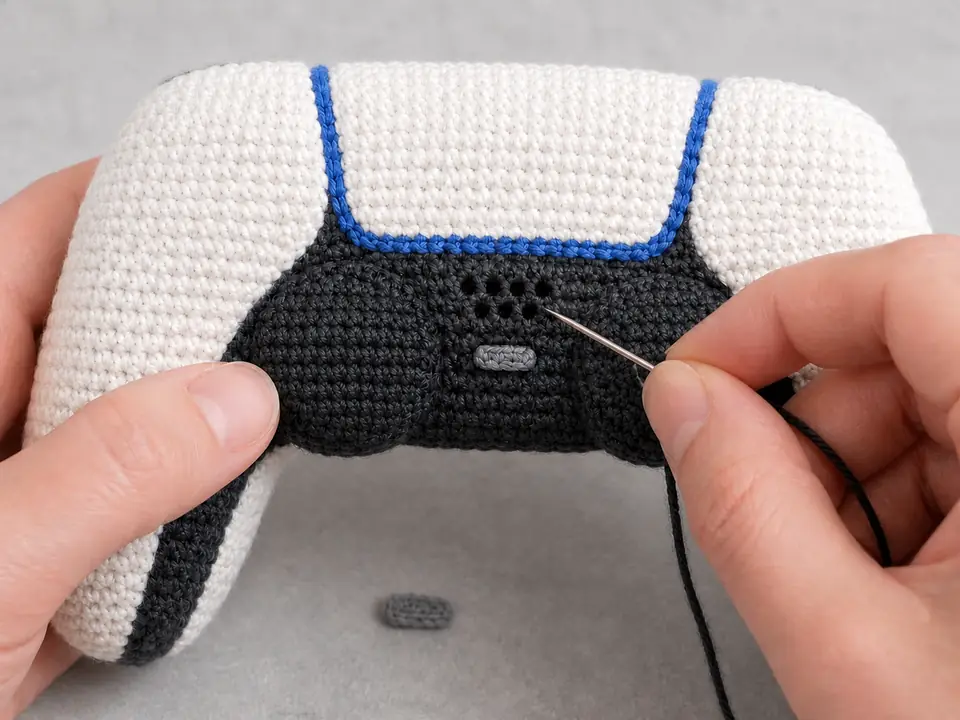
- Embroider the speaker holes. Between the two joysticks, make eight tiny black French knots or short vertical stitches in a compact 3–2–3 arrangement. Knot on the back of the visible layer without pulling the black base inward.
- Sew the center pill. Place it below the speaker group and sew around its outer edge with gray yarn.
- Build the left D-pad. Arrange four gray petals in a cross with their narrow points touching at center. The rounded ends face up, down, left, and right. Sew each petal around the outer edge.
- Add the two upper ovals. Place one small gray oval above the D-pad and the other above the face-button group.
- Build the right button group. Arrange the four gray circles in a diamond, matching the scale and spacing of the D-pad.
- Place the joysticks. Sew the two flat base discs across the lower charcoal center, one beneath each control group. Then reinforce each raised cap through the base and black body with several hidden passes.
Troubleshooting
My two black silhouettes do not match.
Check the bridge first: both must have 42 stitches and 10 rows. Each handle should then have the same sequence of 13, 11, 9, and 7 stitches. If only the row length differs slightly, damp-block both silhouettes to the same outline before joining.
The white shells cover too much of the black inner handles.
Move each shell slightly outward before sewing. If the wide top still reaches too far inward, omit Rows 22–25 or stop at 13 stitches. The exposed charcoal strip is part of the controller’s recognizable shape.
The upper panel curls after I add the blue edge.
Your blue slip stitches are too tight. Remove the edging and repeat it with a larger hook or noticeably looser tension. The blue trim should follow the white panel without shortening its sides.
The controller looks like a pillow instead of a sculpted object.
Remove fiberfill until the black core is only lightly padded. The white side shells may be a little rounder, but the center and inner handle edges should remain relatively flat.
My joysticks lean to one side.
Sew the base discs down completely before adding the caps. Center each cap, then make four anchoring stitches at 12, 3, 6, and 9 o’clock before filling the spaces between them.
Frequently Asked Questions
Can I use acrylic yarn?
Yes. Choose a smooth, tightly spun worsted acrylic and use a hook that produces firm fabric. Cotton gives sharper edges, but acrylic makes a lighter and slightly softer finished piece.
Can I make the controller larger?
Use bulky yarn and a hook sized for dense amigurumi while keeping every stitch count unchanged. This enlarges all pieces proportionally and is more reliable than adding rows to only one section.
Can I change the colors?
Absolutely. Keep a strong contrast between the base and the side shells so the layered construction remains visible. The blue edge can become any accent color that suits your game room or gift recipient.
Is this a toy?
No. It is a decorative soft sculpture. If giving it to an older child, double-sew every applied piece, embroider flatter joysticks if preferred, and inspect all seams regularly.
Important Notes
Printing tip: Use your browser’s Print command. The pattern includes a clean print layout that removes decorative buttons and reduces ink use.
You Crocheted That!
Your finished controller now has the same layered visual language as the reference piece: bright side shells, a dark sculpted center, crisp blue trim, symmetrical controls, and dimensional joysticks. Display it on a game-room shelf, use it as a playful photo prop, or make it for someone who loves both yarn and games.
For your next project, try our beginner-friendly bunny amigurumi pattern, or explore more surprising ideas in You Can Crochet That?!